15 November 2010

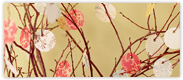
The crisp, cool air and the trees dropping their summer glory are reminding us that winter is quickly approaching. Surrounding us is the beauty of this season, and from Breezy‘s studio emerged an illustration capturing a sweet glimpse of Autumn.

Autumn joys are captured in this precious painting. Prints available here.

28 October 2010
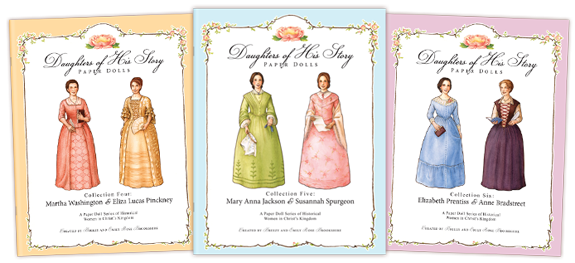
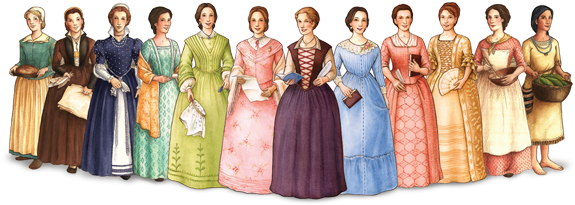
We are delighted to present our latest paper dolls from the Daughters of His Story series. We have had a wonderful time this summer working on the next three collections which feature Martha Washington and Eliza Lucas Pinckney, Mary Anna Jackson and Susannah Spurgeon, and Elizabeth Prentiss and Anne Bradstreet.
These ladies have become so dear to us as we studied their lives and legacies. We hope that they become as dear to to you, and that you are blessed by the Lord’s goodness radiating from their hearts. We want young ladies to grow up knowing that the Lord cherishes purity and holiness, and that He changes the world through those who are faithful to His Word.
Noble Rose Press is having a grand sale for the announcement
of the latest paper dolls! Click here to see the great prices and read a
little more about these godly women from history!
It is not only possible to remain unstained by the world, by the Lord’s strength, but it is imperative that we be proactive in glorifying God in our lives. These women from the past are shining examples of dedication to the Lord’s work as wives and mothers who changed the world.

28 August 2010
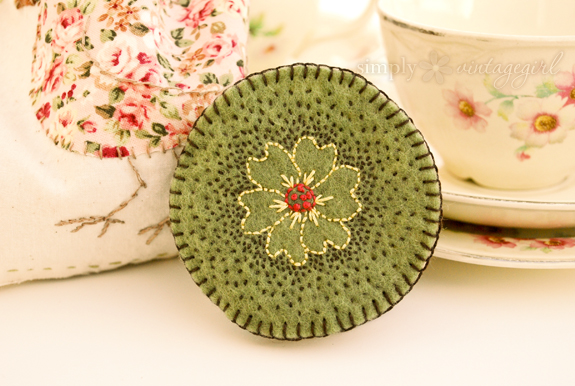
Needlebooks come in quite handy for keeping track of your pins and needles (and make a charming addition to any sewing basket).
I’ve created several of these lovely and portable cases to use while working on large sewing projects, associating each unique design with pleasant memories. Making needlebooks is a wonderful way to practice embroidery . . . and they make lovely gifts, too!
Here is how you can make your own {primrose style} needlebook . . .
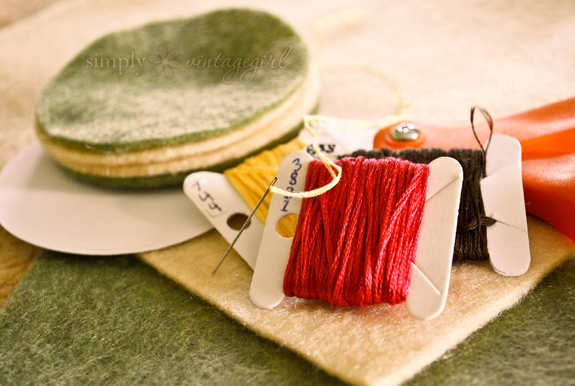
The Supplies
- Felt (wool or cotton)
- Embroidery Floss
- Needle
- Scissors
- Circle pattern from card stock (three inches in diameter)
The Directions (click the pictures to enlarge)
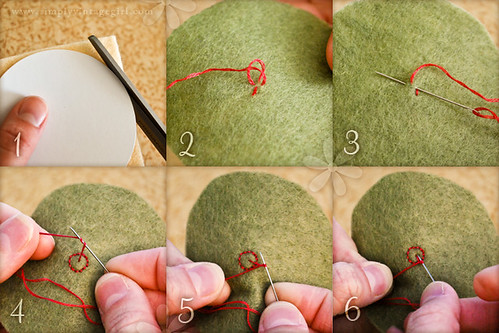
1. Following your pattern, cut out four pieces of felt (two for the outside cover and two for the inside).
2. On the back of the front cover piece, make a knot in the felt.
3. Bring the needle to the front and by Back Stitching, sew a circle in the middle of the cover. This will be the center of the Primrose.
4. Fill the center of the flower with Double French Knots (as shown in directions 4-6). Pull your thread through the font and wrap the thread around the needle twice.
5. Hold tightly onto the thread about an inch from the stitch.
6. Insert needle into the felt, making sure that it is right next to the original stitch. If it goes back into the same hole that it came up from, the stitch will pull through to the back and need to be redone. Pull thread all the way through until a little knot appears.
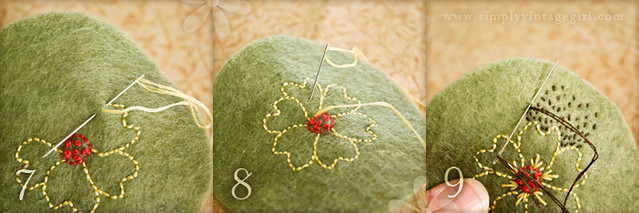
7. Back Stitch the outline of the flower petals.
8. With the straight stitch, add three little lines at the base of each petal to give it depth.
9. The Seed Stitches are small straight stitches randomly sewn every which way. Sew these around the outside of the flower close together and gradually farther apart as you stitch away from the petals.
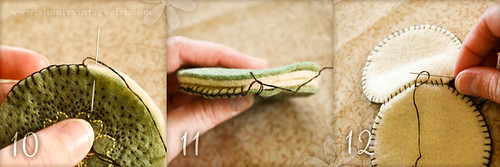
10. Blanket Stitch around the edge of the front and inside two pieces, leaving about one and a half inches of the circumference un-stitched.
11. Place the other two pieces on the back side of the first two with the second inside piece facing the already sewn inside and the back outside piece facing outwards.
Continue the blanket stitch on all four pieces for the un-sewn inch and a half. Then finish sewing the blanket stitch around the edge of the back side two pieces.
12. Run the thread through the felt where it cannot be seen from the inside or outside. Bring the thread to the surface of the outside and double knot.


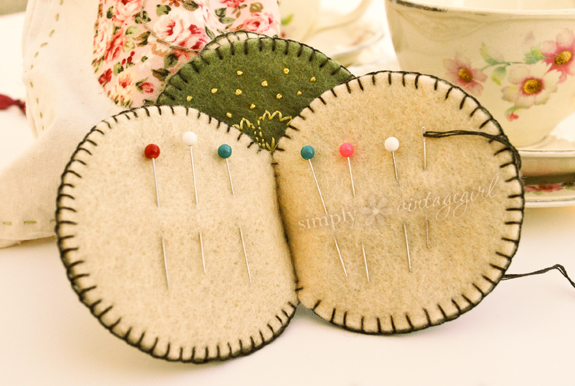
One of the beauties of needlebooks, is that you can take this idea and create a wide assortment of your own variations, whether they be for personal use, decoration, or gifts!
There are endless possibilities to the extra beauty you can create using different styles, sizes, shapes, embroidered decorations, etc!
This tutorial was originally created for the beautiful magazine “The Girlhood Home Companion,” a magazine for daughters, mothers, and grandmothers published by Remembrance Press.
26 July 2010
There once was an old dollhouse looking for a new home. It was handmade with love, for a special little someone . . . but she grew up and no longer wanted it.
It went to the garage sale, hoping for a new family.
A treasure-seeker found it, and saw the love put into creating it. She bought it with plans to revamp it, re-furnish it, and refine it, so that one day it would could be a dollhouse again.
But, sadly, the treasure-seeker did not have the time or opportunity to bring about her plans. It was time, again, for the dollhouse to find a new home, where hopefully it could be cherished. And that is how I come into the story.
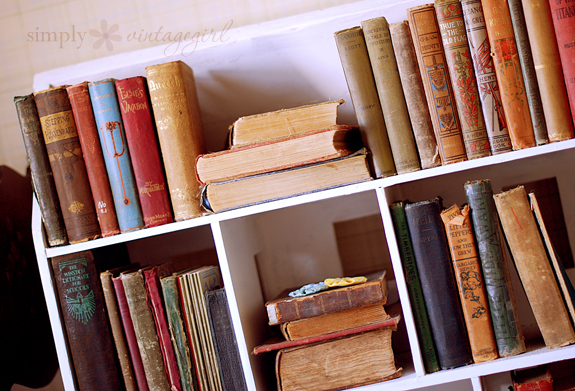
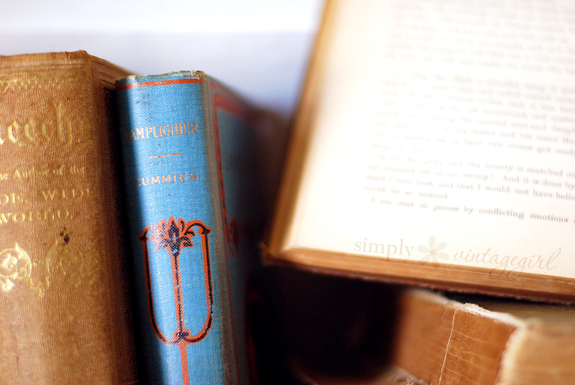
Although I do not play with dolls, or create miniature furniture . . . I do collect old books. And those books were in need of a happy place to reside – a place where they could be seen and enjoyed.
That dollhouse is where the stories in those old books now sit.
An old dollhouse, handmade with love, now filled with old books, being treasured anew.
Click here to subscribe to Simply Vintagegirl!
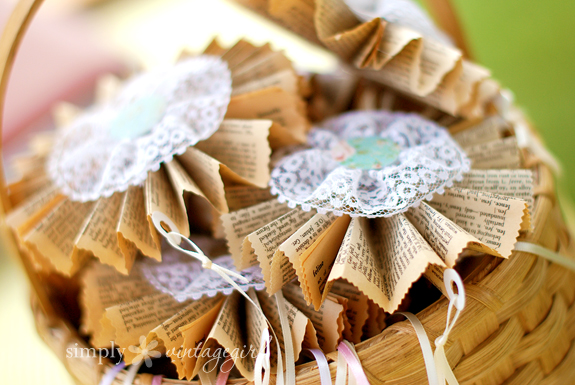
23 June 2010

On June 12th, I was surrounded by my precious family and many friends whom I have had the pleasure of knowing in my lifetime. They came to celebrate what the Lord has done in my life, how He has taught, instructed, and guided me.
And how He laid it on the hearts of my parents to educate my sister and me at home.
My dear parents spoke to those gathered at our home about the workings of the Lord and His great mercy He has shown towards our family. What a blessing and encouragement to hear them speak and glorify the Lord with a testimony of His goodness.
It was a beautiful day. I have an over-abundance of things to be thankful for!
As you may well know, I will be learning for the rest of my life. I have been blessed with a love of learning. The celebration was the end of my “official” education at home, but I won’t stop the adventure there. (We do have more projects in the works!)
The decorations shown above were made from folded, vintage dictionary pages which were hot-glued together. On top was glued lace (which had been sewn into a circle) with scrapbook paper added to the center. They make for a perfect whimsical decoration!
29 May 2010

These elegant fabric flowers are very simple to make . . . and only take a few basic supplies. The finished product is delightfully lovely, and at times can look like a real flower! Every flower will turn out differently and that is part of the beauty!
If you haven’t used those tea lights in a while, now’s the time! I hope you enjoy making these as much as we do . . . below are instructions with pictures on how to make your own.
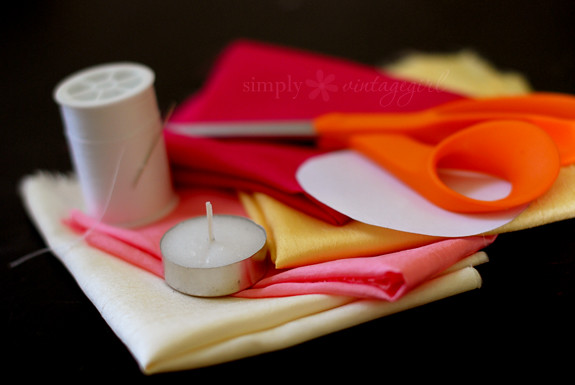
Supplies:
· Synthetic Silky Fabric
· Scissors
· Candle (preferably a tea light)
Additional supplies:
· Needle and Thread, Glue Dots or Glue Gun
· Buttons and/or Beads
Directions:
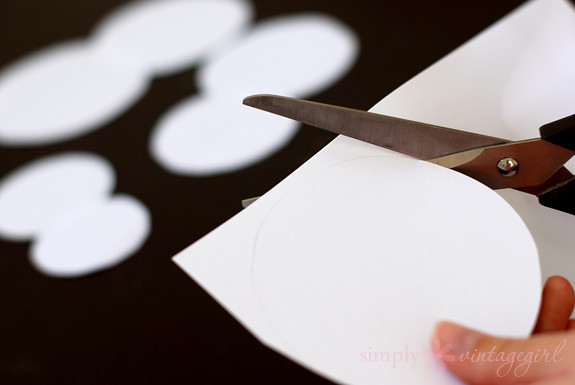
1. Cut circle patterns out of card stock.
Make the largest one’s diameter about half an inch larger than you want the diameter of the flower, as the petals will end up shrinking a bit. Create a few of these, lessening the diameter bit by bit so that the end result has smaller petals in the center and larger ones around the outside. You can also use a pattern here, which works very nice!
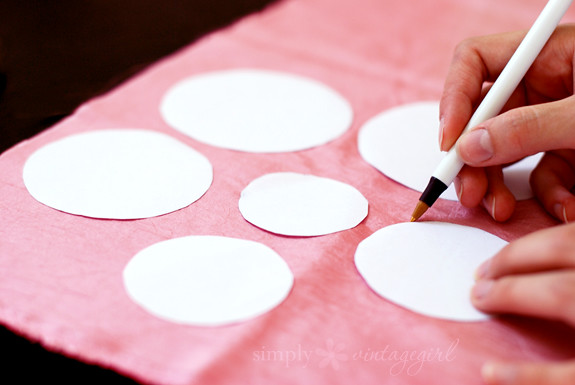
2. Trace around the pattern onto the silk fabric (using a pen).
You can also cut around the pattern and skip the drawing part, it just might not be as uniform . . . but with these, uniform isn’t necessary. And if it’s not uniform, it adds character. And character is good.
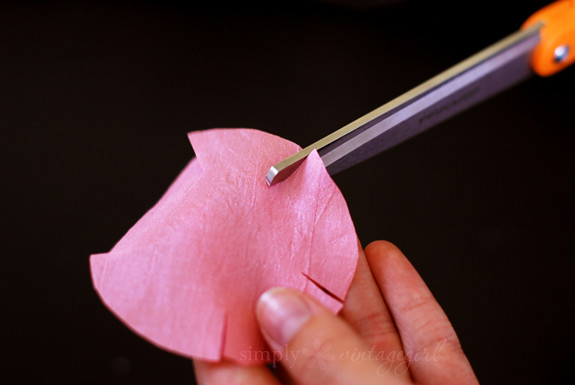
3. Take the scissors and cut out the circle and petals.
Cut just inside the drawn lines to make a circle out of the fabric. Carefully cut only about a third of the way into the circles to create the petals. You can do as many or few petals as you would like, or even add some variety to them. I cut five times, making five medium-sized petals. You can also round the corners of the petals, if you so desire.
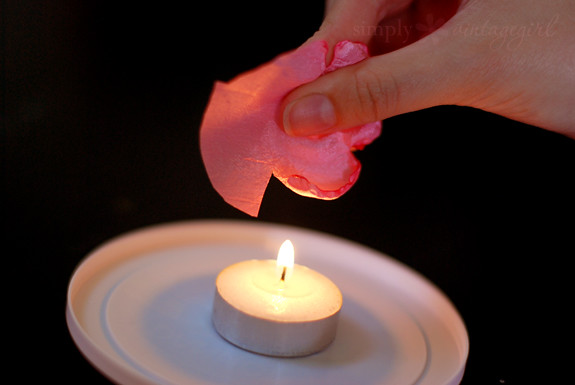
4. Use the lit candle to melt and crinkle the edges.
Be very careful (please have adult supervision, this is rather dangerous), as it is very easy to get burnt. Hold the cut petals about one to two inches above the flame, making sure to keep the circle rotating so that it does not overheat and catch fire. Continue to gently melt the edges of each petal until you have gone all the way around. Do this with each layer.
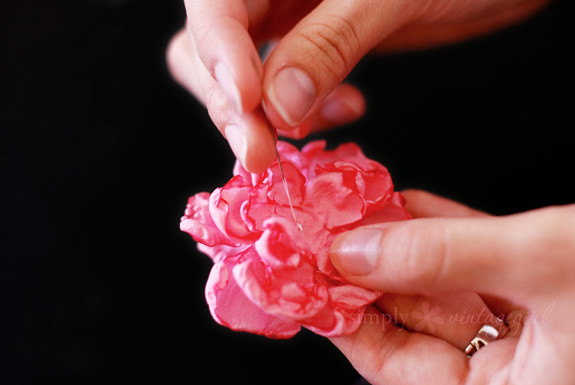
5. Sew (or glue) the petal layers together.
Using a needle and thread, create a beginning knot and then sew the layers together. You can come up through the top because the center of the top layer can be covered by a button or bead. To finish the flower, sew (or glue) the button or bead on top.
If you would like to add extra stability to the flower, you can sew or glue a piece of felt onto the back (make sure it is large enough to give good stability, but small enough so that it won’t be seen from the top).
For a hair accessory, you can sew or glue the back of the flower to the back of a bobby pin, ponytail holder, or snap-clip.
For a broach, you can sew or glue them onto a broach pin or even a safety pin.
And the list could go on of how these flowers can add extra beauty!
What are some of your ideas?
And remember: every flower will turn out differently and that is part of the beauty!
(Thank you, Breezy (my artist sister), for being such a wonderful hair and hand model!)
Subscribe to Simply Vintagegirl and like on Facebook!
22 May 2010

“One does not need to have a degree, nor even a tremendous talent, to enjoy and bring enjoyment to others through the medium of gardening. God’s planted garden was both pleasant to look at and its produce was good to eat! There should be something of both these aspects in every person’s garden.“
This reminds me of playing with a little friend and going to the garden to gather things for “tea” . . . in the garden we found the perfect ingredients for our teapot as well as some lovely flowers for decoration.
“There is great satisfaction in . . . restoring some old cast-off to a place of usefulness and beauty, or rescuing some discarded piece of wood, stone or metal from the dump and turning it into an object that has purpose and charm in your home.“
Just like making flowers out of fabric, we can create things and express the creativity that the Lord has given us. (By the way, the tutorial is coming next week!)
“We foolish mortals sometime live through years of not realizing how short life is, and that TODAY is our life.“
Today is our life. Let us spend every moment with wisdom and in the fear of the Lord!
“People so often look with longing into a daydream future, while ignoring the importance of the present.“
We must live everyday to its fullest in serving our God. We need to be passionate about tomorrow and today, so that we can be prepared for the future and not miss the opportunities that the Lord gives us here and now.
All italicized quotations are from the book “Hidden Art” by Edith Schaeffer.
14 May 2010
These little fabric flowers add such a delightful touch to any lady’s attire! They are feminine, delicate, and oh-so-lovely!
One of the best things about them is that they are especially easy to create! You need only three main items to make them (+ some embellishments, for extra beauty). Would you care to guess the needed supplies?
Looking for a tutorial? It’s right here!