28 August 2010
Needlebooks come in quite handy for keeping track of your pins and needles (and make a charming addition to any sewing basket).
I’ve created several of these lovely and portable cases to use while working on large sewing projects, associating each unique design with pleasant memories. Making needlebooks is a wonderful way to practice embroidery . . . and they make lovely gifts, too!
Here is how you can make your own {primrose style} needlebook . . .
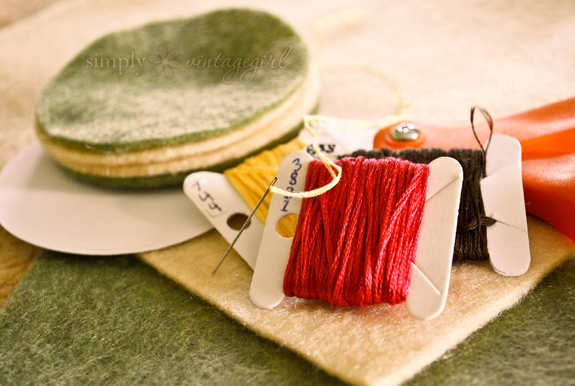
The Supplies
- Felt (wool or cotton)
- Embroidery Floss
- Needle
- Scissors
- Circle pattern from card stock (three inches in diameter)
The Directions (click the pictures to enlarge)
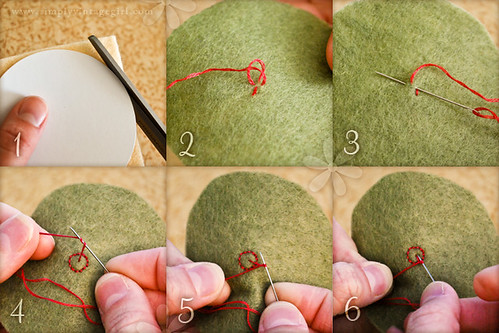
1. Following your pattern, cut out four pieces of felt (two for the outside cover and two for the inside).
2. On the back of the front cover piece, make a knot in the felt.
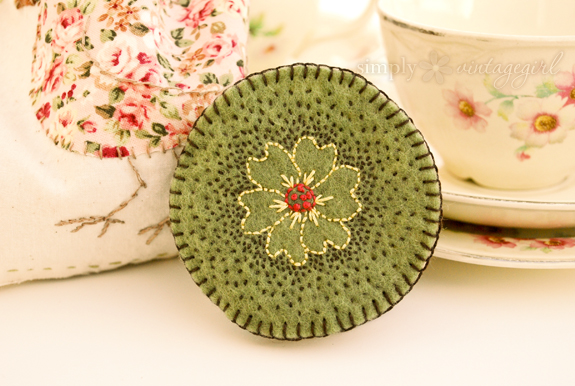
3. Bring the needle to the front and by Back Stitching, sew a circle in the middle of the cover. This will be the center of the Primrose.
4. Fill the center of the flower with Double French Knots (as shown in directions 4-6). Pull your thread through the font and wrap the thread around the needle twice.
5. Hold tightly onto the thread about an inch from the stitch.
6. Insert needle into the felt, making sure that it is right next to the original stitch. If it goes back into the same hole that it came up from, the stitch will pull through to the back and need to be redone. Pull thread all the way through until a little knot appears.
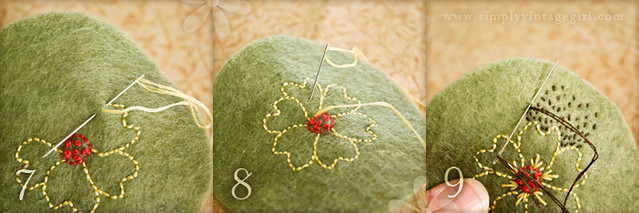
7. Back Stitch the outline of the flower petals.
8. With the straight stitch, add three little lines at the base of each petal to give it depth.
9. The Seed Stitches are small straight stitches randomly sewn every which way. Sew these around the outside of the flower close together and gradually farther apart as you stitch away from the petals.
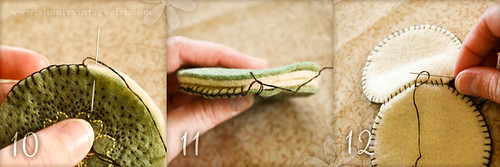
10. Blanket Stitch around the edge of the front and inside two pieces, leaving about one and a half inches of the circumference un-stitched.
11. Place the other two pieces on the back side of the first two with the second inside piece facing the already sewn inside and the back outside piece facing outwards.
Continue the blanket stitch on all four pieces for the un-sewn inch and a half. Then finish sewing the blanket stitch around the edge of the back side two pieces.
12. Run the thread through the felt where it cannot be seen from the inside or outside. Bring the thread to the surface of the outside and double knot.


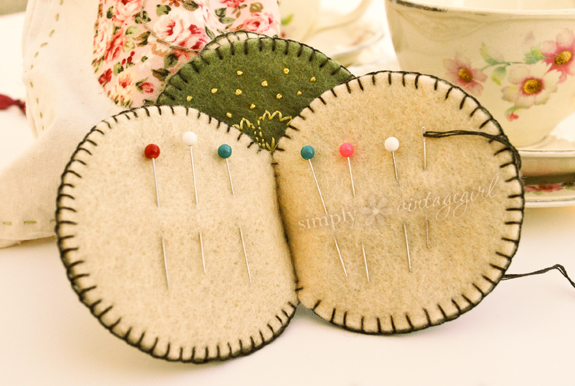
One of the beauties of needlebooks, is that you can take this idea and create a wide assortment of your own variations, whether they be for personal use, decoration, or gifts!
There are endless possibilities to the extra beauty you can create using different styles, sizes, shapes, embroidered decorations, etc!
This tutorial was originally created for the beautiful magazine “The Girlhood Home Companion,” a magazine for daughters, mothers, and grandmothers published by Remembrance Press.


Jenna on Aug 27, 2010 said:
Oh, what a wonderful and creative tutorial, dearest Emily. Thank you so much for sharing! You did a beautiful job on your needlebook!
May the Lord bless you and your sweet family!
Your Sister In Christ,
Jenna
Alison on Aug 27, 2010 said:
Thank you for the tutorial! This needle book is darling.
Laryssa @ Heaven In The Home on Aug 27, 2010 said:
Lovely idea, thanks!
Stacy on Aug 27, 2010 said:
Wow. That is truly lovely. Thank you for sharing this idea with us!
Amanda on Aug 28, 2010 said:
So lovely, thank you for sharing such a beautiful craft
Miss Rachel P. on Aug 28, 2010 said:
It’s LOVELY Emily Rose! :D What beautiful stitches! I love this idea, I took some needles with me the other day to work on a project, and I had to take my whole needle pack with me instead of just a neat little case like this. ;) And yes, I think these would make such sweet gifts! :)
Hope you all have a blessed weekend!
Love and Hugs!
~Rachel~
Mary on Aug 28, 2010 said:
Absolutely beautiful. Thank you for the lovely tutorial.
God bless…
:-)
Tammy on Aug 28, 2010 said:
These are just gorgeous! I think they’d be the perfect project for my girls to practice handstitching. I want to make one too! Thanks for sharing.
Rebecca on Aug 28, 2010 said:
I love it! I will be making some of these sometime! what a great idea for gifts for friends who want to sew or do sew! thanks Emily! Your stitches are beautiful and small! :)
Elizabeth on Aug 28, 2010 said:
What a beautifully sewn needlebook crafting project! I love the embroidery stitches you stitched on the cover and the blanket stitches around the edges~truly lovely!
I thought I recognized the stack of felt from a photo you published a while ago of a sneak peek of the Girlhood Home Companion! And I am excited that you posted it here!
Well, I’m looking forward to making a few of these gems sometime! Thanks for the lovely tutorial!
Joyfully in Jesus,
Elizabeth
Becky, slave of Christ on Aug 28, 2010 said:
Beautiful! The embroidery details are really lovely. Thanks for sharing!
Miss. Antoinette on Aug 28, 2010 said:
How sweet! I LOVE it!
Thanks for sharing!
Blessings in Christ,
Miss Antoinette
Sara B on Aug 28, 2010 said:
So very lovely, Emily Rose! The workmanship and artistry is just perfect. I love needlebooks…I’m still partial to one I made at 6yo (??), pink with a scottie dog on the front!
Luci on Aug 28, 2010 said:
What a neat tutorial! Thank you so much for sharing! I’m off to try making one myself! :)
Blessings,
Luci
Rachel on Aug 28, 2010 said:
A simply perfect Home made Christmas gift idea!!
Sara on Aug 28, 2010 said:
How adorable is that? There’s another craft I can add to my to-do list! :)
Pauline Vane on Aug 28, 2010 said:
This is soooooo cute!!!! It is a great idea and I’ll have to make one!
It’s a good idea for a birthday gift to a person who loves to sew!!!!
A friend,
Pauline
KristiAna on Aug 28, 2010 said:
I absolutely love this! It is a very cute needlebook, I love the embroidery for. You embroider beautifully! Where did you learn how to embroider? Thank you so much for sharing!
Blessings,
KristiAna
Hannah Mendenhall on Aug 28, 2010 said:
Emily Rose,
That is just precious!
It was so good to see your family last weekend, and I especially enjoyed talking with your Mom. She was sharing snippets about starting a business, but we (Sarah and I especially) would really appreciate if we could discuss everything in more detail. Whenever you have a free afternoon we would love to get together and discuss business over a healthy meal : )
May God bless you and Breezy as you persevere through the end of your current project. I am sure it will touch many lives.
Many Thanks and Blessings,
Hannah
P.S.
Will you be attending the Atherton’s Labor Day gathering?
Natasha on Aug 28, 2010 said:
That is so pretty! Thank you for the tutorial!
Anna Olivia on Aug 28, 2010 said:
~* How adorable!!! I think I shall try making one. =) =)
Connie / ReFabulous on Aug 29, 2010 said:
So darling. I can’t believe it, but I don’t have a needlebook, and now I know I really, REALLY need one. Thank you for sharing this! :)
Rachel Crosswhite on Aug 29, 2010 said:
Hello!
This is so cute! I’ll have to make one!
On a scale from 1 to 10 … 10 being the hardest…how hard is it to make this?
Love Rachel ~
Leah on Aug 30, 2010 said:
What a inspiring idea! I might just make one… :-)
It does seem much more portable than a pincushion…
Yours’ is beautiful! Thanks so much for the wonderful tutorial!
It’s a joy to read your blog. :-D
Blessings,
Leah
Grace on Aug 30, 2010 said:
Oh, how lovely! Thank you so much for sharing. I shall have to keep in mind this wonderful tutorial; what a lovely gift it shall make for dear friends for the holidays!
Thank you again!
Blessings,
Grace
Sarah Mae on Sep 2, 2010 said:
Amazing and beautiful – these are the types of posts I’m looking for for RH – can you post it on there pretty please? :)
Kathleen on Sep 3, 2010 said:
That is absolutely lovely! Thank you for sharing your process.
Andrea Felcyn on Sep 7, 2010 said:
Wool felt is so nice to work with. This is a lovely pattern and a well-written tutorial. Thanks!
Elena on Sep 13, 2010 said:
Thank you Emily!! You just solved the problem of my grandmother´s birthday gift! :-)
tracy g on Sep 26, 2010 said:
Love this idea! May make Coasters like this for Silent Auction!
Tammy on Oct 10, 2010 said:
What a very simple sweet idea! It would be a good project for my girls :-)
Blessings,
Tammy ~@~
Valerie on Oct 13, 2010 said:
how pretty !
even though i’m not an embroiderer, now I just feel like making one !! (or several)
Liliane on Nov 26, 2010 said:
congratulations , nice work. I’ll try to make one ,I’, thinking in using a recicled CD as a base.
Kisses from Brazil,
Liliane
Sarah on Jan 11, 2011 said:
Thank you for this project. I made some for my mom and sister for Christmas gifts, and they loved them!
Suyapa on Mar 3, 2011 said:
Im going to make my own this weekend, and a few more to my closest friends!!!! Thanks, and thanks God for this woman!!
andrea coutinho on May 4, 2011 said:
adorei, até post em meu blog,vai me visitar também!
te espero.
bjs!
Anne Belley on Jun 8, 2011 said:
I love it! I am sure my girls will really enjoy making this practical craft. You chose lovely colors and stitches!
Valerie Zhang on Jul 14, 2011 said:
I am absolutely thrilled to have come across a beautiful blog like this. I’m currently studying in order to prepare to be baptized into Christ, and just seeing how you conducted your life so colorfully and in ways praise God for giving you that talent is truly inspiring!
I hope to become your sister in Christ soon and really adored the wedding pictures. (Hope my future other-half and I will praise God and live life as sweetly as the couple in your pictures :)
Maria Carriger, OKC on Sep 11, 2011 said:
I love this, so cute and unusual.
Alex Sand on Dec 8, 2011 said:
What a great project for those of us that can’t keep track of our pins and needles, especially when I like to stitch on the go! Your site has some really lovely ideas…thanks!
anya on Jan 17, 2012 said:
Your work is really beautiful :)
RJ on Feb 15, 2012 said:
I was inspired by your embroidery and your tutorial to make a needlebook last month – the link is in my “website URL” above.
Kimberley on Mar 21, 2012 said:
Oh so simple, and beautiful! Thank you for sharing. Your little needle book is going on my To-Do list :) A perfect present for mothers & grandmothers!
vijaya on Nov 15, 2012 said:
It is really wonderful. I love it. I always wastes time to pick the needles from my box. This is absolutely time saving and beautiful.
Norma Jean on Mar 19, 2013 said:
Hello, fellow Hoosier…I came across your blog quite by accident while searching for handmade flower info (I’m doing the florals for a friend’s wedding). I’ve never seen a needle book…never heard anyone refer to one, either; however, after seeing the info and photos here, I’m in love with the idea. Your tutorial is so engaging to me that I left the page open for many days. I’ll bookmark this and come back to look in the future…not because I need instruction- it’s a simple concept and I’ll have no trouble executing one -but because I so enjoy the look of your work and your presentation. Thank you.
Margaret Johnson From Australia on May 29, 2015 said:
So simple so handy, so small to take along on many trips, Thank you for this lovely tutorial. Blessings from Down Under xxx
Sherri L Ruiz on Jun 6, 2017 said:
I made one of these precious cases last night as a give away at an embroidery class I will host on June 19th, 2017. I loved the project!! It was fun and simple enough to do as I relaxed in the evening. I changed the embroidery on the front and used some bright colors.Love it!!